When it comes to home improvement, one of the most rewarding yet challenging tasks is restoring your wooden floors. While many homeowners opt to hire professionals, there’s a growing trend of people taking matters into their own hands by tackling DIY floor sanding. If you’re looking to save both time and money, DIY floor sanding is an excellent option. Not only can you achieve great results with a little patience and the right tools, but you’ll also get the satisfaction of completing the project on your own terms.
In this guide, let us explore why DIY floor sanding is a smart financial and time-saving decision, how to do it properly, and what you can achieve with the process.
Why Choose DIY Floor Sanding?
For many homeowners, the idea of taking control of their home improvement projects is incredibly appealing. DIY projects allow you to put your personal stamp on your home while saving money. When it comes to DIY floor sanding, the value goes beyond the monetary savings. It’s about the sense of empowerment and accomplishment you get from maintaining and improving your home with your own hands.
Restoring a wooden floor through sanding not only enhances the look and feel of your space but also adds to your home’s value. With the right techniques and tools, you can achieve a polished, professional-looking finish without the hefty price tag that comes with hiring professionals.
Why DIY Floor Sanding Can Be a Smart Financial Decision
One of the biggest reasons homeowners choose to sand their own floors is the cost savings. Wooden floor sanding costs can vary greatly depending on the size of the area and whether you hire a professional or do it yourself. On average, hiring a professional can cost anywhere from £12 to £25 per square metre, depending on the complexity of the job and your location. When you take the DIY method, your primary expenses include hiring floor sander hire, sanding consumables, and any protective gear, which adds up to a fraction of the cost.
Moreover, DIY floor sanding allows you to control your budget more efficiently. If you’re renovating your entire house, saving on professional labour costs can free up money for other projects. Plus, if you have more than one room to sand, renting the equipment for a weekend can help you cover a larger area without extra expenses.
Time-Saving Benefits of Taking the Task into Your Own Hands
Another reason to opt for DIY floor sanding is the flexibility it offers with your time. Hiring professionals means waiting for their availability, and often, that can mean delays. When you choose to sand your floors yourself, you can work on your own schedule. Whether you want to tackle it over a weekend or spread it out over a few days, you have complete control of the timeline.
Additionally, by familiarising yourself with the process and avoiding the waiting time for professionals, you can potentially complete the project quicker than you might expect. With the right preparation and tools, you can finish sanding a standard room in a day or two, leaving you with a smooth, polished floor ready for sealing.
How to Prepare for DIY Floor Sanding
Preparation is key to the success of any DIY project, and floor sanding is no exception. Start by clearing the room of all furniture, carpets, and rugs. It’s essential to remove any nails, staples, or tacks that may be sticking out of the floor, as these can damage the sander. Additionally, inspect the floor for any loose boards or cracks that need repairing before you begin sanding.
A little research goes a long way when preparing for your DIY floor sanding project. By gathering the right materials in advance, you’ll save time during the sanding process. You’ll need sandpaper in varying grits, floor sanders (which can be hired from local stores), an edge sander for corners and tight spots, a dust mask, and safety glasses.
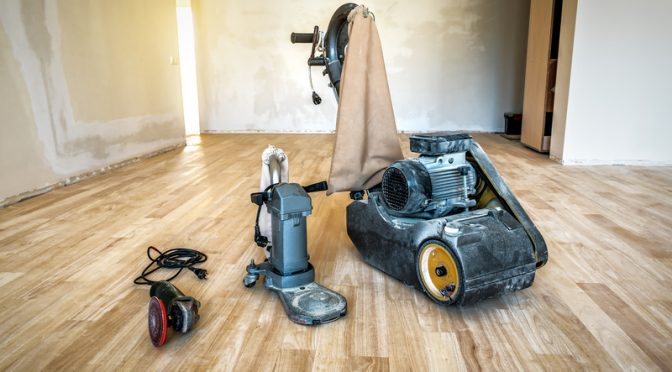
Tools You Will Need for Floor Sanding
For a successful DIY floor sanding project, having the right tools is crucial. By renting the following tools, you save on the high labour costs associated with professional floor sanding hire.
- Drum or Belt Sander: The main tool for sanding the bulk of the floor. These drum or belt sanders can be hired from most hardware stores or specialist rental companies.
- Edge Sander: To get into those corners and edges that the main sander can’t reach.
- Sandpaper (various grits): You’ll need to sand the floor in stages, starting with coarse grit paper to remove the old finish, and then progressing to finer grit to smooth the surface.
- Vacuum or Dust Collector: Floor sanding creates a lot of dust, so it’s vital to keep the work area as clean as possible. Hence considering dust management within the preparation plan is advisable.
- Safety Gear: Dust masks, safety glasses, and ear protection are essential to protect yourself during the sanding process.
Step-by-Step Guide to DIY Floor Sanding
By following the DIY floor sanding tips provided, you can achieve professional results and also help you avoid costly mistakes or delays in your project.
- Sanding the Floor in Stages
Start with coarse-grit sandpaper (around 40 grit) to strip the old finish and remove deep scratches. Progress to medium grit (around 60-80 grit), and finally, use fine grit paper (100-120 grit) for a smooth finish.
- Choosing the Right Grit Size for Different Layers
The grit size of the sandpaper depends on the condition of your floor. If it’s heavily damaged, start with a lower grit to remove imperfections quickly. For smoother floors, you can start with a higher grit to avoid over-sanding.
- Using an Edge Sander
Use an edge sander to reach the corners and along the skirting boards where the main sander can’t reach. Make sure to blend these areas into the rest of the floor to ensure a consistent finish.
- Applying the Right Technique for Even Sanding
When sanding, always keep the sander moving to avoid creating dips in the floor. Follow the wood grain and work methodically across the room, ensuring you don’t linger in one spot for too long.
What You Can Achieve with DIY Floor Sanding
The end result of your DIY floor sanding project can be just as good as professional work if done correctly. With patience and attention to detail, you’ll end up with a beautiful, smooth surface that enhances the overall aesthetic of your home. Plus, knowing you completed the project yourself adds an extra layer of satisfaction.
By following proper techniques and using the right tools, your floors can look polished and professionally done—without the hefty price tag.
Cost Comparison: DIY vs Professional Floor Sanding
To illustrate the savings, let’s break down the costs between the DIY method and hiring professionals. The floor sanding cost with a professional can range between £1,000 to £2,000 for an average-sized room. In contrast, floor sander for hire costs around £50-£100 per day, plus the price of sandpaper and any additional materials. Overall, you could complete the entire project for under £300, a fraction of what you’d pay a professional.
By opting for DIY, you save on labour costs and can reinvest that money into other home improvement projects.
Common DIY Mistakes and How to Avoid Them
While DIY floor sanding can be rewarding, there are some common pitfalls to watch out for. By being mindful of these mistakes, you can ensure your DIY project goes smoothly and delivers excellent results.
- Over-sanding: Sanding too much in one spot can create uneven areas on the floor. Keep the sander moving to avoid this issue.
- Skipping Grit Levels: Jumping from coarse to fine grit without using medium grits in between can leave your floor rough and uneven.
- Neglecting Safety: Always wear a dust mask, safety glasses, and ear protection. Dust from floor sanding can be harmful if inhaled.
Achieve Professional Results with Our Floor Sanders
DIY floor sanding offers a great opportunity to not only save money but also to add a personal touch to your home improvement projects. Taking on the task yourself gives you full control over the process, allowing you to achieve professional-quality results at a fraction of the cost. With the right approach, patience, and tools, sanding your wooden or oak floors can be both a rewarding and financially smart choice.
If you’re considering taking the DIY route, we at Floor Sanders London are here to help you every step of the way. We provide high-quality floor sanders for hire and a range of essential tools and accessories to ensure your project runs smoothly from start to finish. Our affordable and flexible sander packages are tailored to suit projects of all sizes, so you can easily find the best option for your needs.
Ready to explore your DIY floor sanding project? Check out our sander packages and see how we can help you achieve a stunning, professional finish on your floors. If you have any questions or need advice on getting started, don’t hesitate to contact us, to learn more about we can support you throughout your DIY journey!